
Blue Computer!
Beige boxes sitting on or under your desk are pretty boring. I've seen lots of people do weird and wonderful things to their computers, from giving the case a quick lash of paint, to cutting holes in the side in putting in windows (god knows why you'd want to look inside at the mess!). I decided it'd be fun to try and do a really top notch job on painting the whole of my computer system (case, drives, monitor, keyboard and mouse), and did :) Here are some pics to explain what I was doing (with my friend Bob), which might give some hints to those who want to paint theirs too...The basic process was taking the bits apart, cleaning them thoroughly with white spirit (we tried sanding bits down but it ruined the finish in our test runs), masking them up, then giving them three coats of car paint and three coats of lacquer. We used two shades of blue, a darker one (Ford Maritime Blue) for the case, the monitor, the "chassis" of the keyboard and the body of the mouse, and a ligher one (Ford Wedgewood Blue) for the tux stencils, the keys and the buttons on the mouse.
The case
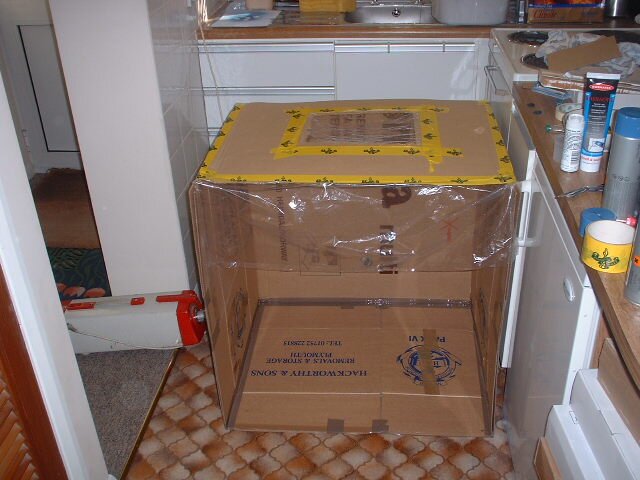
Prepare your painting area... Bob made a big cardboard box out of smaller ones, with one size open for us to spray into. He put a window in the top with transparent plastic so let more light in, a hole in the back to stick a hoover into to suck out dust and fumes, and plastic sheeting to put over the front once we'd sprayed. To be honest we only got this advanced towards the end, but it's a good idea anyway. You'd be amazed at the amount of fumes and paint-dust you get in your lungs and all around the room otherwise :)

Take your computer to pieces, and mask up moving parts and parts you don't want sprayed. This meant about a day in total (spread through the week in which we did it all) just carefully putting masking tape over all the LEDs and moving parts. If you're not practised at this, it's a good idea to have a practice on a few old parts if you can find them.

Give the parts a good clean, and spray three thin, even coats, getting each new coat from a new angle.

Rather than having a completely plain blue case, we made a template of the Linux penguin, Tux, by printing off an image of him and cutting out the outline about 2mm wide, being careful not to leave islands of unconnected paper. We then held the template down with coins (bluetack and masking tape seemed to damage the paintwork because it wasn't completely dry (you need to leave it for a good week!), and gave it about 10 very thin coats of a lighter blue. The end effect was very cool.

It's not like I open it up that often, but we also painted the whole chassis satin black. We wanted to paint the back black, and ended up doing the whole thing :) Oh well, it looks very cool from the back, and great when I do open it up.

See, I told you it looks good. Damn blurry pictures though :(

And it looks nice from the front too. You can just make out the Tux stencil at the bottom, with a SuSE Linux badge stuck over his private parts :)
The keyboard

We took a keyboatd completely to pieces (all the screws were hidden under bits of plastic and rubber on the bottom), and masked over the tray in the top piece, and gave it the usual 3-coat treatment.

For the keys, we made a quick jig out of two pieces of wood and some rubber bands, which held them still while we painted them. 3 coats of blue, and a painstaking process with templates and white paint for the letters. You can get stckers for this, but we thought it'd look funnier and cooler with big slightly messy letters :)

Some examples of painted keys. They were a real pain in the arse to do; it took us days to finish them all off!

Ahh but it was worth it. Such excitment as I held my blue keyboard :) And it actually worked when we plugged it back in! In fact I'm typing on it right now :) I really wouldn't reccomend doing your keyboard unless you're nuts though, in the end we couldn't put a metal bar back in under the space bar to stabilise it, so it's a bit wobbly :)
The monitor

This bit scared the hell out of me, because monitors are more fragile than cases, I still had a warranty on it (well, until I opened it up!), and it has a MASSIVE capacitor in it. Zap!

The monitor came apart into two case sections, which we put some masking tape and newspaper on in various places just so we didn't get any paint on little gaps that would annoy us later on.

Actually painting the monitor case was quite difficult because all the curves make it hard not to create drips, and all the holes meant we had to spray from absolutely every angle to avoid white spots in them.

All in all, a very nice finish, with another, smaller tux on the back. Oh, we took the sticker off and gave the area a *really* thorough clean with white spirit before painting.

Monitor cases look quite strange without the monitor in!
The mouse

The mouse came apart without too much trouble, and it was quite easy to paint, just a few thin coats to avoid drips.
Tadaaa!
